Now for a real recipe! I decided to write my first food post detailing some "Pinata cookies" I made about a week ago. The story behind these - I was done finals and Noah wasn't. Thus, I needed something to do. Noah remembered me talking about these cookies I had seen on Pinterest and suggested that I make them! (A completely selfless act, I'm sure!) A short shopping trip to Johnny's later, I was on my way.

Day One: The Dough!
So, the recipe (http://www.sheknows.com/food-and-recipes/articles/958083/cinco-de-mayo-pinata-cookies) called for homemade sugar cookie dough:
Cream 1 cup of sugar and 1 cup of powdered sugar with 1 cup of butter. Beat in 2 eggs, and add 1 cup vegetable oil.
Combine the dry ingredients together in a separate bowl:
- 5 cups flour
- 1 tsp baking soda
- 1 tsp salt
- 1 tsp cream of tartar
Add 1 tbsp vanilla and 1 tsp almond extract.
Next, it's time to dye the dough pretty colors!
Split the dough up into five even-sized balls and dye each one a different color (the original blog suggests pink, purple, orange, blue and yellow...I did purple, orange, blue, green, and red...do whatever you want!), and one smaller ball (this one will be black). The recipe suggests gel food coloring, but I used the liquid and it worked just fine!

Next, you layer the dough. I used a small bread pan and layered the dough by crumbling and pressing it. I put the black on the bottom, then alternated the colors in a rainbow pattern (black, purple, blue, green, orange, green). Then, you let it sit for at least four hours (or overnight like I did!).
Day Two: Let's Cook These Babies!
After the dough has set, you cut it vertically so that you have 1/4" pieces of dough (see picture from the original recipe below).
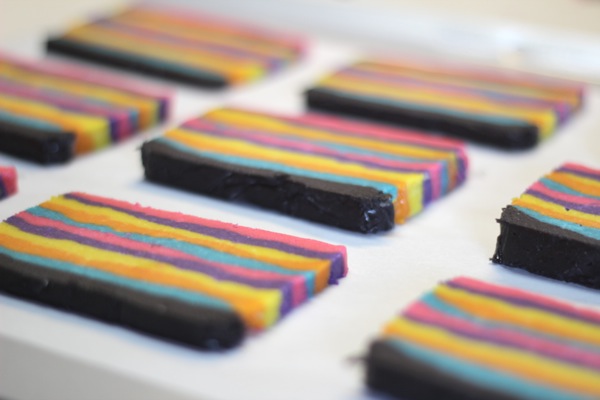
You then bake for ~12 minutes at 350°F. The recipe suggests lining the sheet with parchment paper - note taken, I didn't do that this time around!
Immediately after they come out of the oven, you cut them with a donkey-shaped cookie cutter...or in my case, a heart-shaped one...really, you could use any shape! In some of the cookies you have to make a little pocket so that you can put the goodies (M&M's, etc.) inside later!

The next part is SUPER easy. While the cookies are cooling, add 2 tsp milk to 1 cup powdered sugar and stir to make some frosting glue to hold the cookies together.
Then you simply stack the cookies together. Place one cookie face down, place one cookie with a pocket on it, held together with the frosting glue, then add your goodies! I couldn't find mini M&M's at ANY store for some odd reason, so I used Nerds instead, which was a fun surprise! Then just top the cookie stack with another cookie, secure it with frosting glue and you're set to go!

Lessons from this recipe/suggestions for improvement (I feel like I'm writing a lab report...):
1. The dough was a bit greasy at first, so I had to de-grease with paper towels; the cookies still tasted good, but perhaps a bit less butter/oil in the dough recipe.
2. The dough was delicious, but a lot of work, I might just buy pre-made dough and dye it next time!
3. The cookies were too thick - cut them a little thinner next time!
4. Don't let the dough sit for too long (I did two nights), because it got a bit crumbly (part of the reason I couldn't cut it thin enough).
Overall, this was a really fun recipe. It definitely is a lot of work, but it pays off big time when people eat them - they don't know what to expect! Although I never thought I'd see the final product, it all worked out in the end!
Good luck with the recipe if you try it! Comment with questions or tips!
-C
No comments:
Post a Comment